rooting a Tapo C500
I bought a Tapo C500 — a cheap little pan-tilt Wi-Fi camera — fully intending to use it as a camera for about a week before the itch kicked in. You know the one: I wonder what’s running in there. Spoiler: a tiny Linux box that really didn’t want me poking around. So I poked around.
By the end I had a permanent UART console, a known root password, and persistent SSH over key auth — surviving reboots, no serial cable required. Here’s the whole ride, gotchas and all.
Usual disclaimer, then I’ll shut up about it: this was my own camera, on my own network. Do the same.
 The patient, opened up — front.
 …and the back.
the target
A quick teardown and some strings later, here’s what we’re dealing with:
- SoC: Ingenic XBurst T23N — MIPS32r2, little-endian (the byte order matters later, hold that thought)
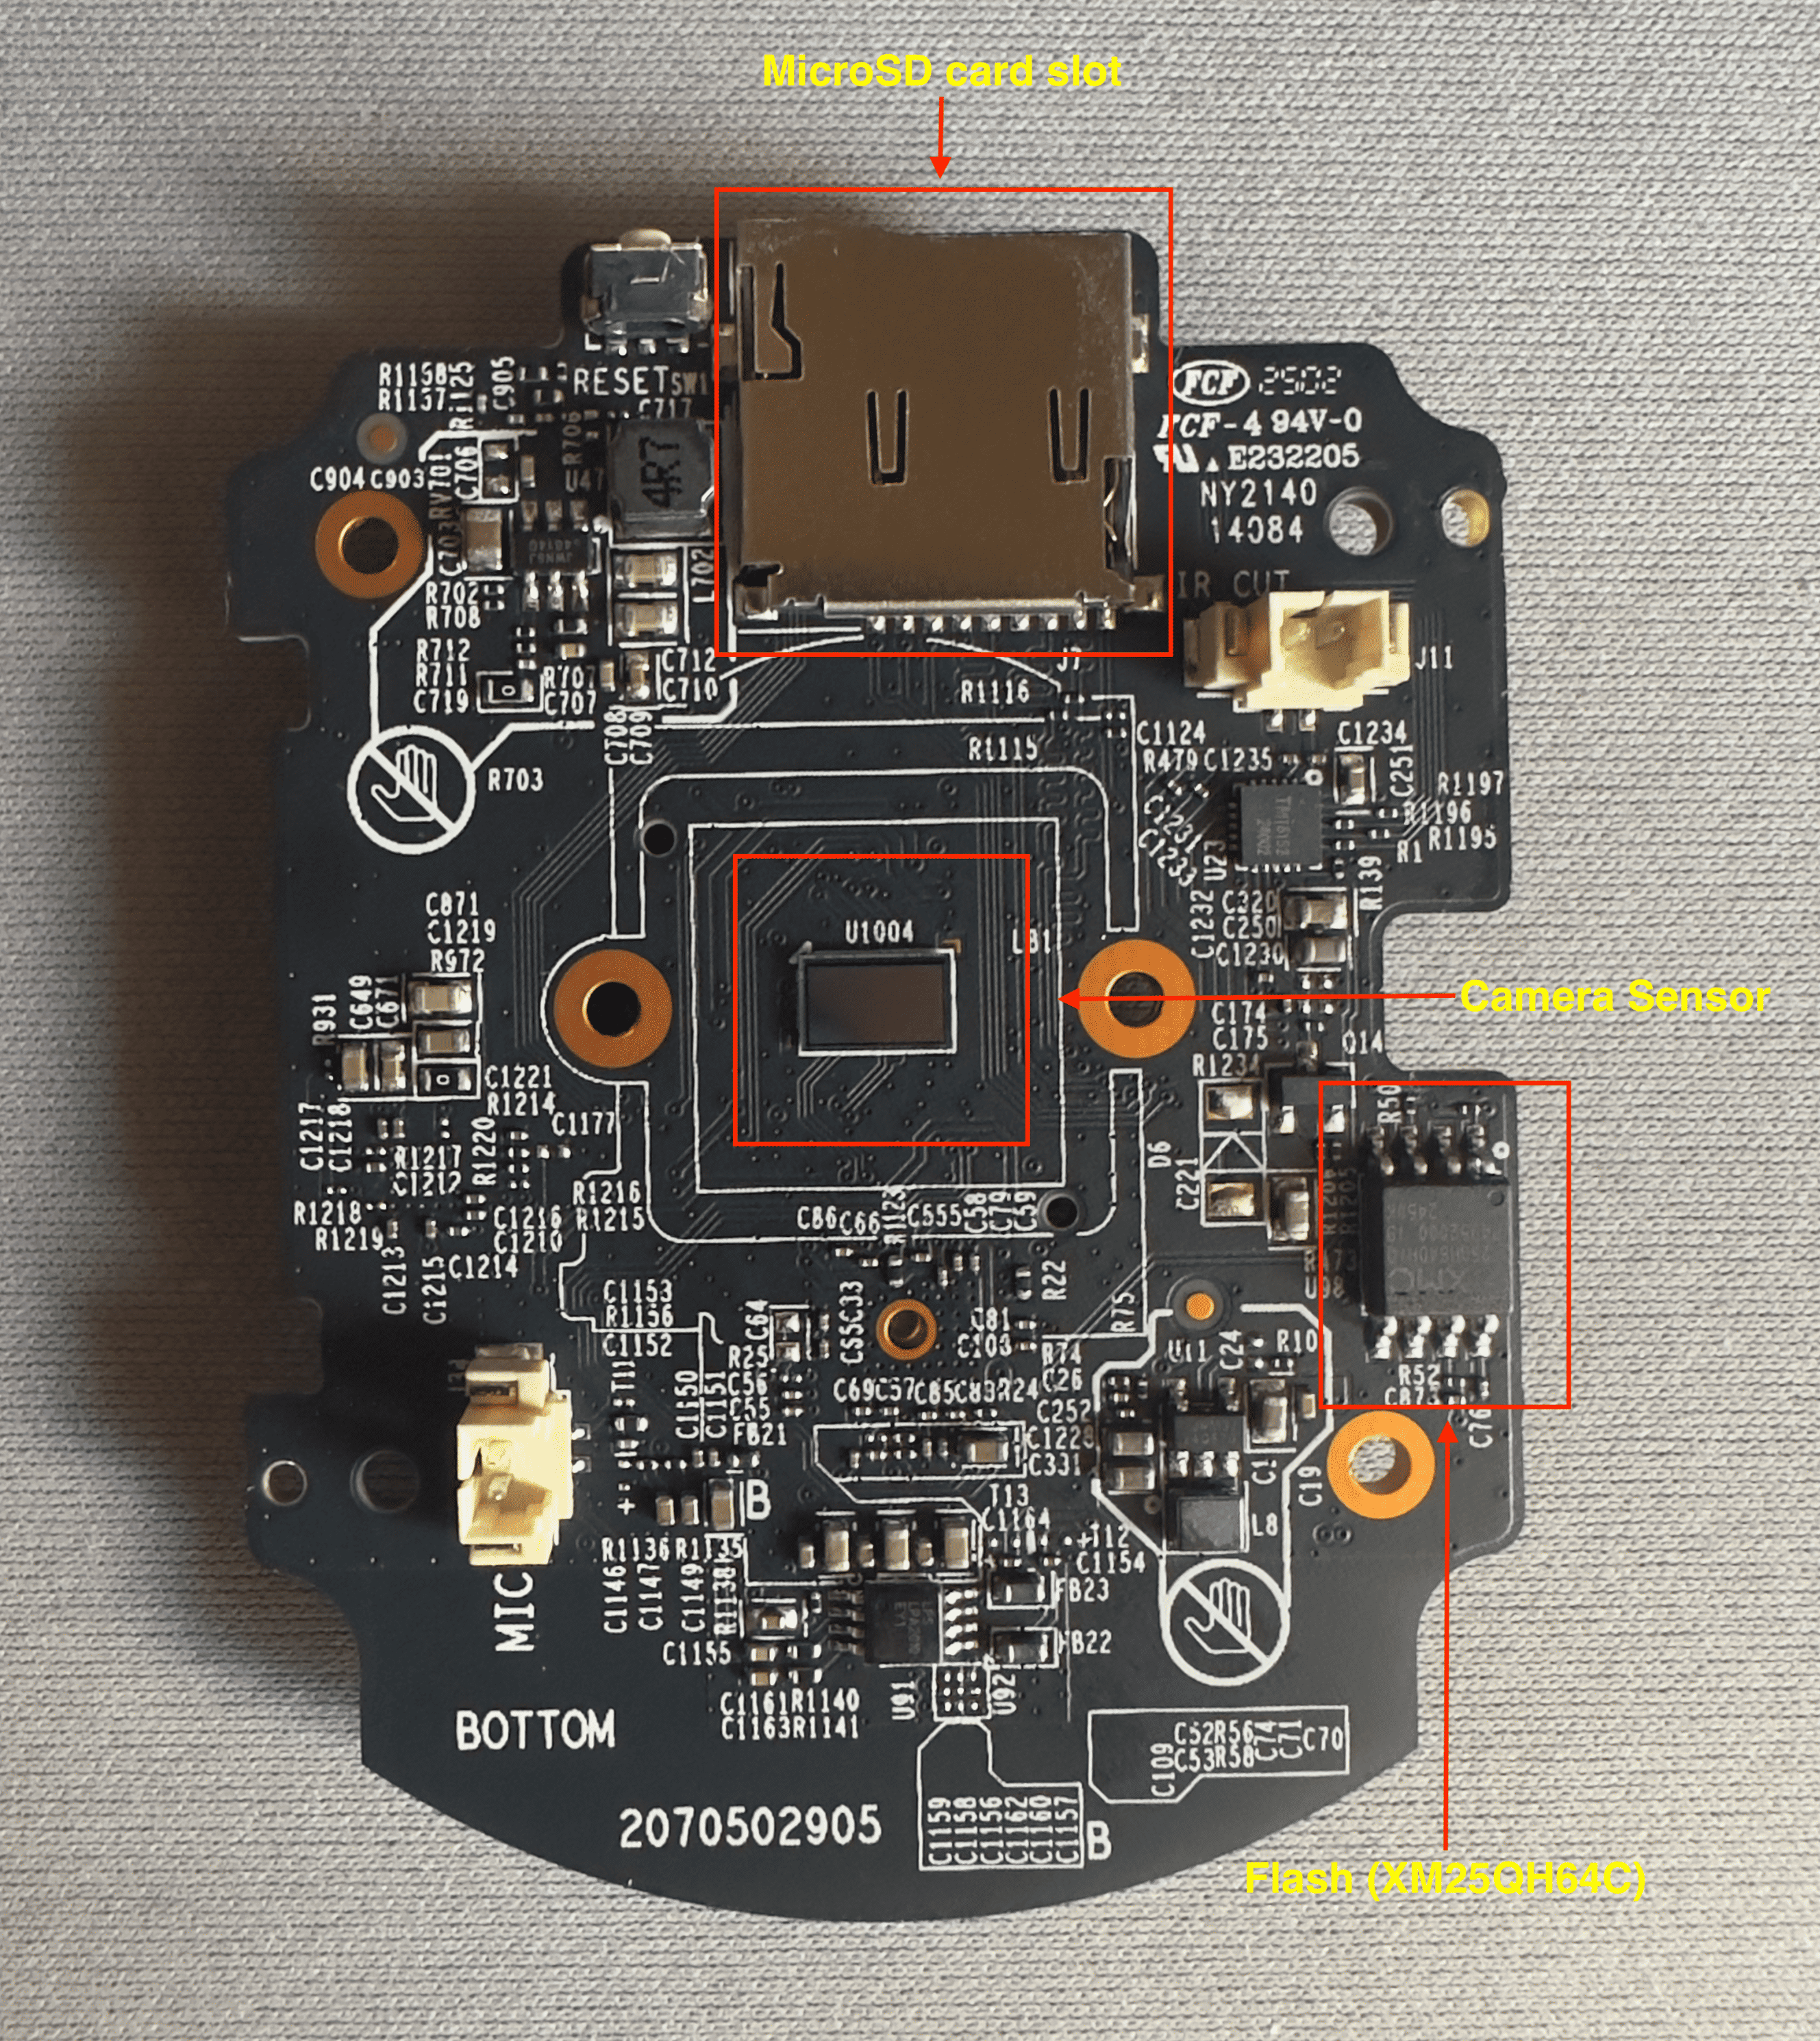
- Flash: 8 MB NOR (XM25QH64C)
- OS: Linux 3.10.14 with a BusyBox userland, OpenWrt-ish overlay setup
- Bootloader: U-Boot 2013.07
Nothing exotic — which is exactly the kind of thing that’s fun, because everything is almost where you’d expect it.
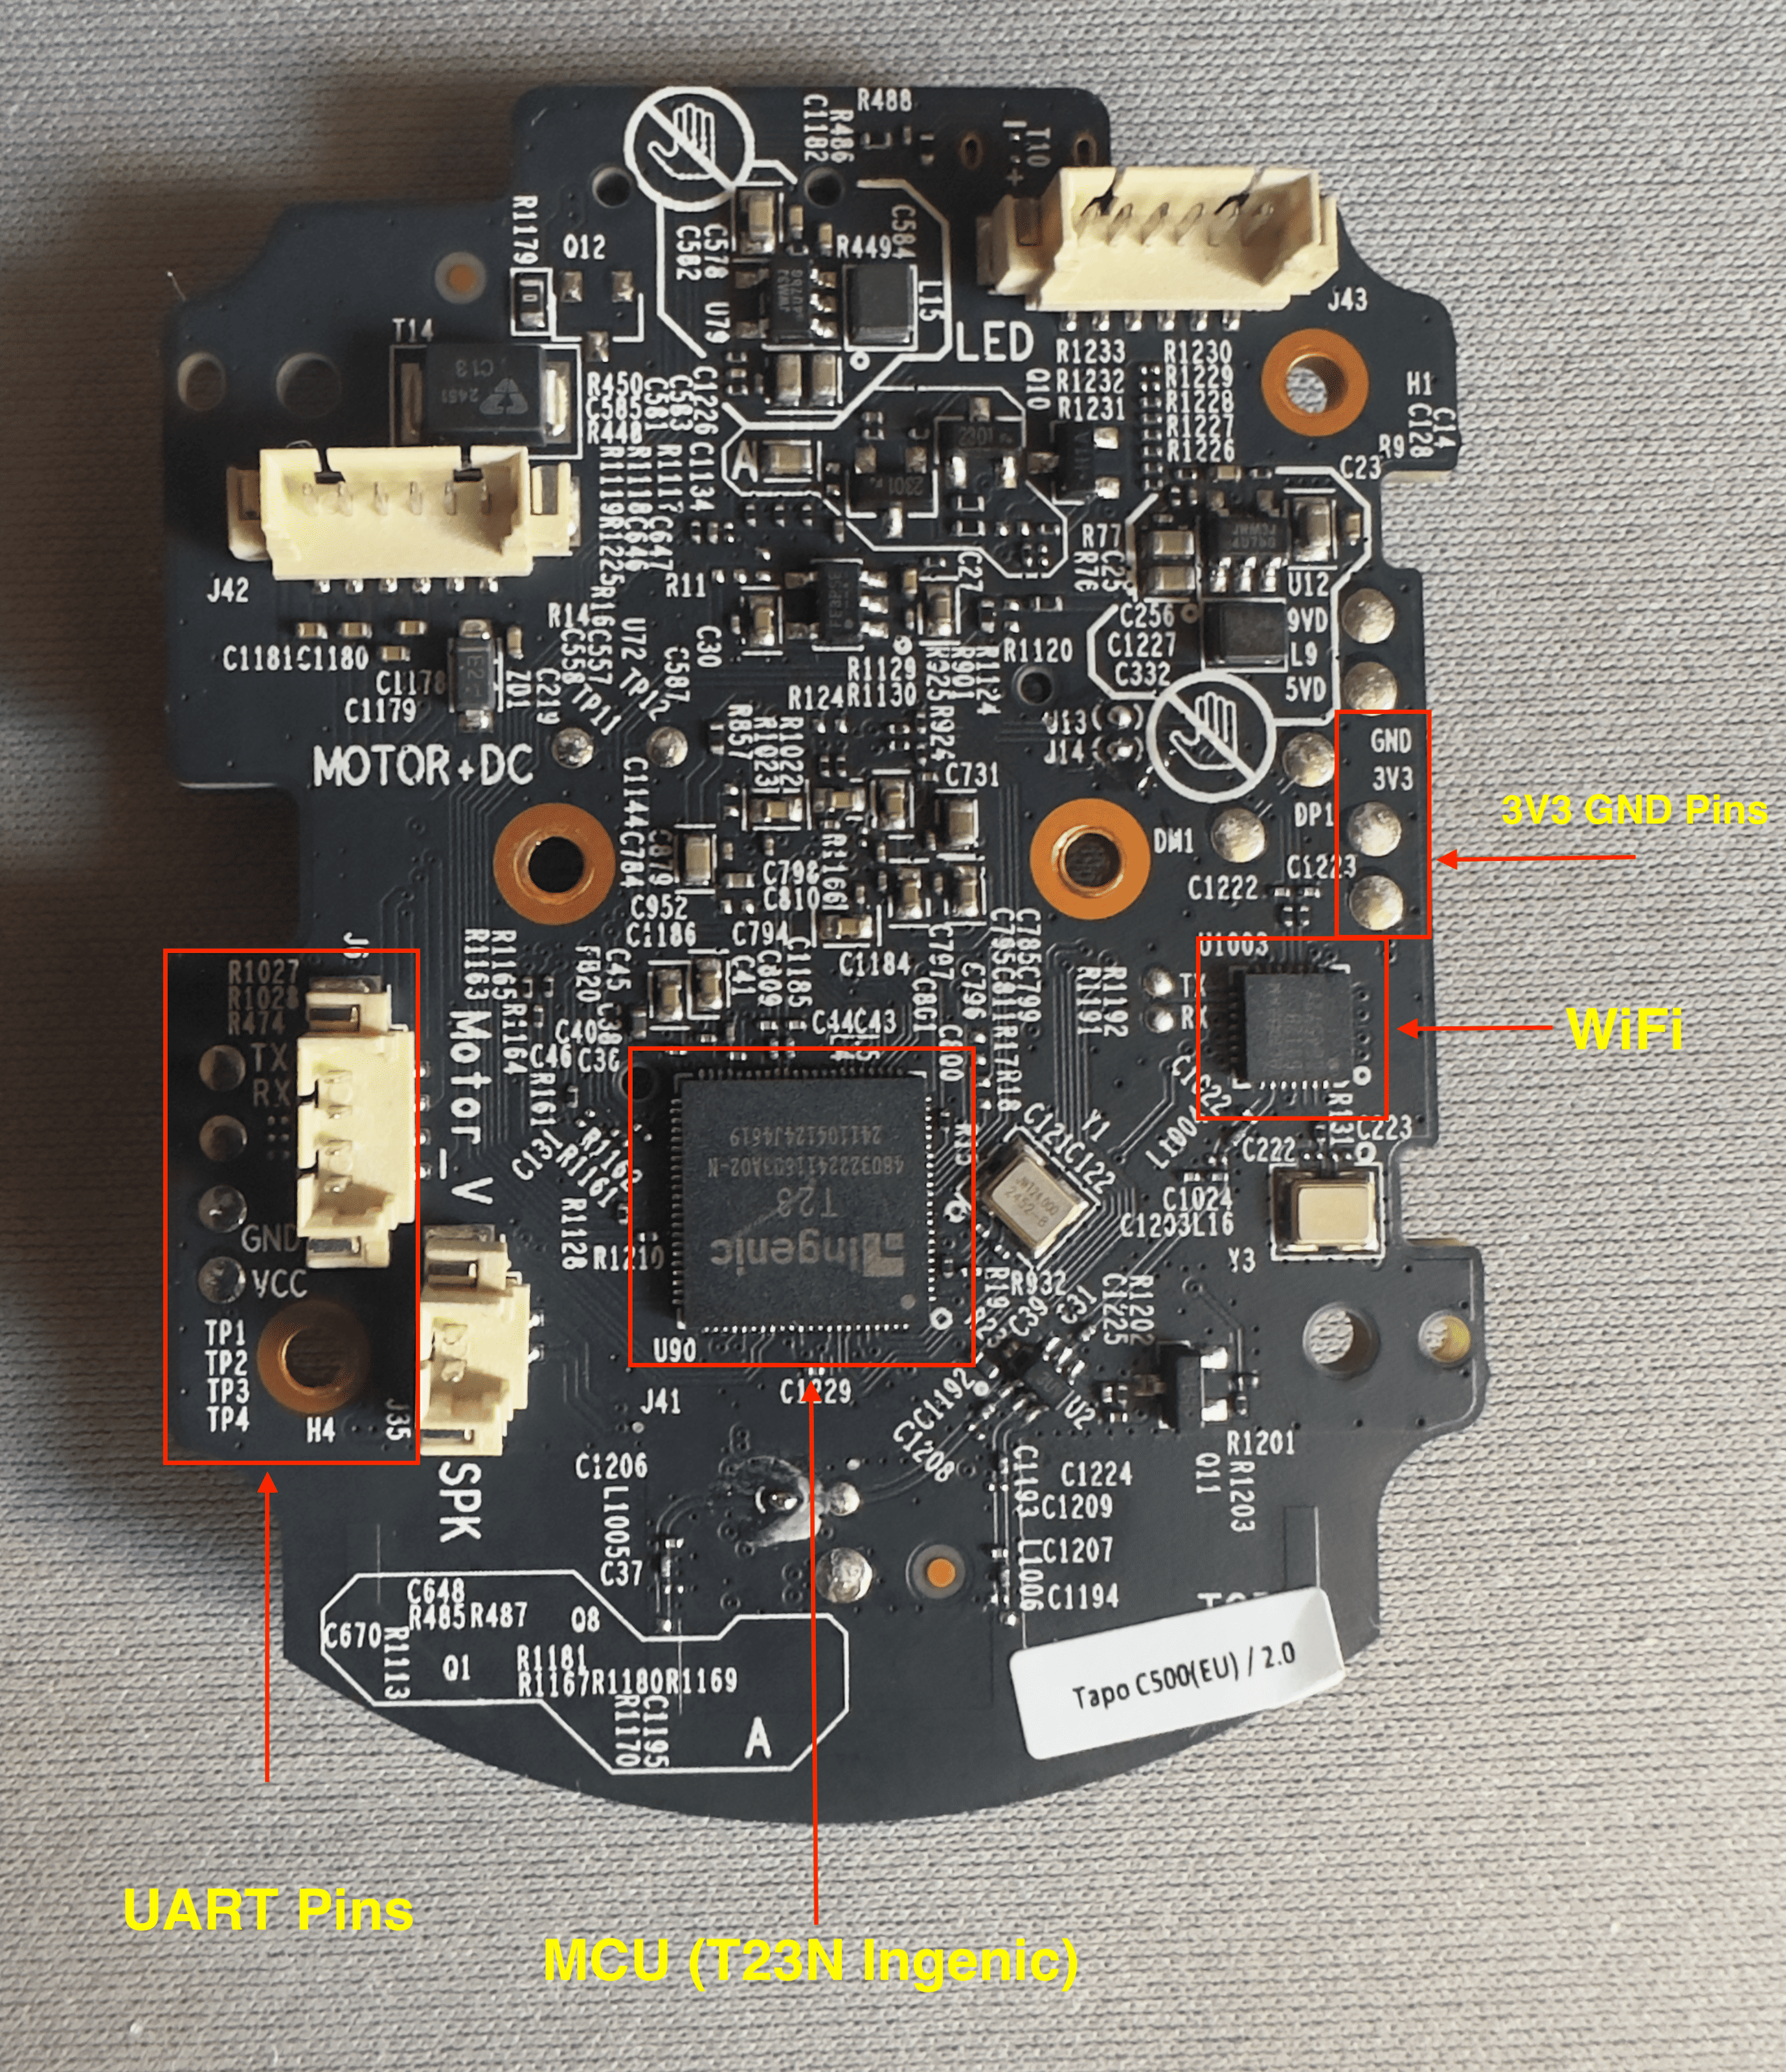
getting at UART
Every one of these cameras has a serial console somewhere. The manufacturer needs it on the assembly line. On the C500 it’s three test points on the PCB — TX, RX, GND. There’s no header and no labels, and the RX/TX points sit floating, so before anything else it was soldering iron time: tin the pads, solder on three thin wires, and bring them out to a USB-serial adapter. (There’s a VCC pad too — leave it. The board is already powered over its own supply.)
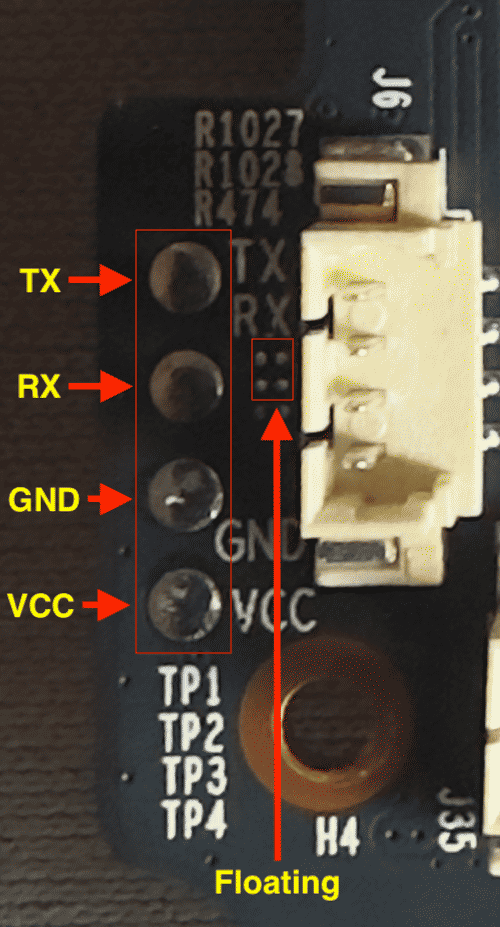 TX / RX / GND, with leads soldered on. Bare floating pads until you tin them.
TP-Link is reliably standard here: 115200 8N1. Hooked it up, hit power, watched it boot.
The bootloader is polite enough to let you interrupt it: during boot it watches the serial line for a magic key, which for this U-Boot is slp. Spam it and you drop into a U-Boot prompt instead of booting the OS. Now we can read the flash.
dumping the flash over an SD card
There are a few ways to get 8 MB of NOR off a board:
md.bover serial — works, but it’s painfully slow and drops characters.- Read the chip directly on the PCB — clip a SOIC-8 onto the XM25QH64C and pull it with a CH341A/flashrom. This is the next-easiest route if there’s nothing else, and it’s how I’d have done it on a board with no removable storage.
- Use the SD card, which is what I did — because this PCB has a microSD slot (it’s a camera, it records to a card), and that means U-Boot can talk to it directly. Copy flash → RAM → SD, fast and verifiable, no soldering beyond the UART I already had.
So, from the U-Boot prompt:
mmc rescan
mmc dev 0
mmcinfo                              # sanity-check the card is there

sf probe
sf read 0x80600000 0x0 0x800000      # whole 8MB flash -> RAM
mmc write 0x80600000 0 0x4000        # RAM -> SD, from block 0

# verify: read it back off the SD and compare in RAM
mmc read 0x81000000 0 0x4000
cmp.b 0x80600000 0x81000000 0x800000 # -> "...were the same"
See that 0x4000? That’s the facepalm. This U-Boot reads mmc block counts as hex. The first time I typed 16384 thinking “8 MB / 512 = 16384 blocks, done.” U-Boot read that as 0x16384 — about 46 MB — and cheerfully splattered ~46 MB onto the card on write, then hung the board on read by scribbling 46 MB into 0x81000000, right over U-Boot’s own memory. 8 MB is 0x800000 bytes, which is 0x4000 blocks. Give the counts in hex or suffer. Lesson filed.
Then pull the card and dump it on the Mac:
diskutil list                                  # find the card by size
diskutil unmountDisk /dev/diskX
sudo dd if=/dev/rdiskX of=dump.bin bs=1024 count=8192   # exactly 8 MB
shasum -a 256 dump.bin
(rdiskX is the raw device — much faster on macOS. If a “disk not readable” popup shows up, hit Ignore.)
reading the boot log
Before touching the dump, the boot log basically hands you the map — if you read it:
U-Boot SPL 2013.07 ... Board info: T23N
SF: Detected XM25QH64C
Firmware check pass!
cmd_buf = sf probe;sf read 0x80600000 0x50000 0x20000   # loads normal_boot (0x50000)
cmd_buf = go 0x820a0000                                  # jump to 2nd-stage
...
memory: 003c8000 @ 00010000 (usable)                     # kernel RAM starts at 0x00010000
Linux version 3.10.14 ... (Ingenic r2.3.3)
Kernel command line: ... rootfstype=squashfs ro ... root=/dev/mtdblock6 rw \
                     spdev=/dev/mtdblock7 noinitrd init=/etc/preinit console=ttyS1,115200n8
...
decrypt_rootfs_header done                               # kernel decrypts the first 512B of rootfs
16 RedBoot partitions found on MTD device jz_sfc
A lot falls out of that command line. root=mtdblock6 is the rootfs. spdev=mtdblock7 is a second filesystem (“sp_rom”). init=/etc/preinit runs before any overlay is set up — that’ll matter a lot later. console=ttyS1 is our serial. And decrypt_rootfs_header done: the rootfs is… encrypted? (Also note memory: ... @ 00010000 — we’ll need that exact number for Ghidra.)
Cross-referencing the log with /proc/mtd gives the full flash map:
| mtd | name | offset | size | notes |
|---|---|---|---|---|
| 0 | factory_boot | 0x000000–0x02d800 | 0x02d800 | read-only |
| 1 | factory_info | 0x02d800–0x030000 | 0x002800 | model / serial |
| 2 | art | 0x030000–0x040000 | 0x010000 | wifi calibration — don’t touch |
| 3 | config | 0x040000–0x050000 | 0x010000 | DES-ECB encrypted |
| 4 | normal_boot | 0x050000–0x070000 | 0x020000 | 2nd-stage bootloader |
| 5 | kernel | 0x070200–0x1c0000 | 0x14fe00 | LZMA uImage |
| 6 | rootfs | 0x1c0000–0x3d0000 | 0x210000 | squashfs, header encrypted |
| 7 | rootfs_data | 0x3d0000–0x770000 | 0x3a0000 | squashfs (sp_rom), no encryption |
| 8 | user_record | 0x770000–0x7f0000 | 0x080000 | jffs2 (rw, persistent) |
| 9 | verify | 0x7f0000–0x800000 | 0x010000 | checksums |
Three partitions end up mattering: mtd6 (rootfs, encrypted, almost no free space), mtd7 (sp_rom, not encrypted, ~3.6 MB free), and mtd8 (the one genuinely writable, persistent partition).
the encrypted rootfs
Here’s the fun part. The rootfs partition isn’t straight squashfs: the first 512 bytes are encrypted, and the kernel decrypts them at boot (that decrypt_rootfs_header done line). Everything after the first 512 bytes is normal squashfs. To unpack the firmware offline, I needed the cipher, the key, and the IV.
into Ghidra: finding the key
The key is baked into the kernel — but the kernel on flash is an LZMA uImage, so strings on the raw dump shows nothing useful. Decompress it first, then load the decompressed kernel into Ghidra.
Getting the load address right is the whole game. Load it at the wrong base and none of the lui/addiu pairs resolve, so you get zero string XREFs and you’re staring at raw file offsets forever. On MIPS, kseg0 maps virtual 0x80000000 → physical 0x0, and from the boot log the kernel’s RAM starts at 0x00010000:
memory: 003c8000 @ 00010000 (usable)
=>  base = 0x80000000 + 0x00010000 = 0x80010000
(The go 0x820a0000 from U-Boot is the decompression entry, not the link base — don’t use that one.) So in Ghidra: import as MIPS:LE:32 (little-endian — confirmed from the busybox ELF header, ELF32 LSB, e_machine = 8) and set the base to 0x80010000 (Window → Memory Map → Set Image Base if you imported at 0), then re-analyze with the MIPS Constant Reference Analyzer on, or the lui+addiu never gets tied back to its string.
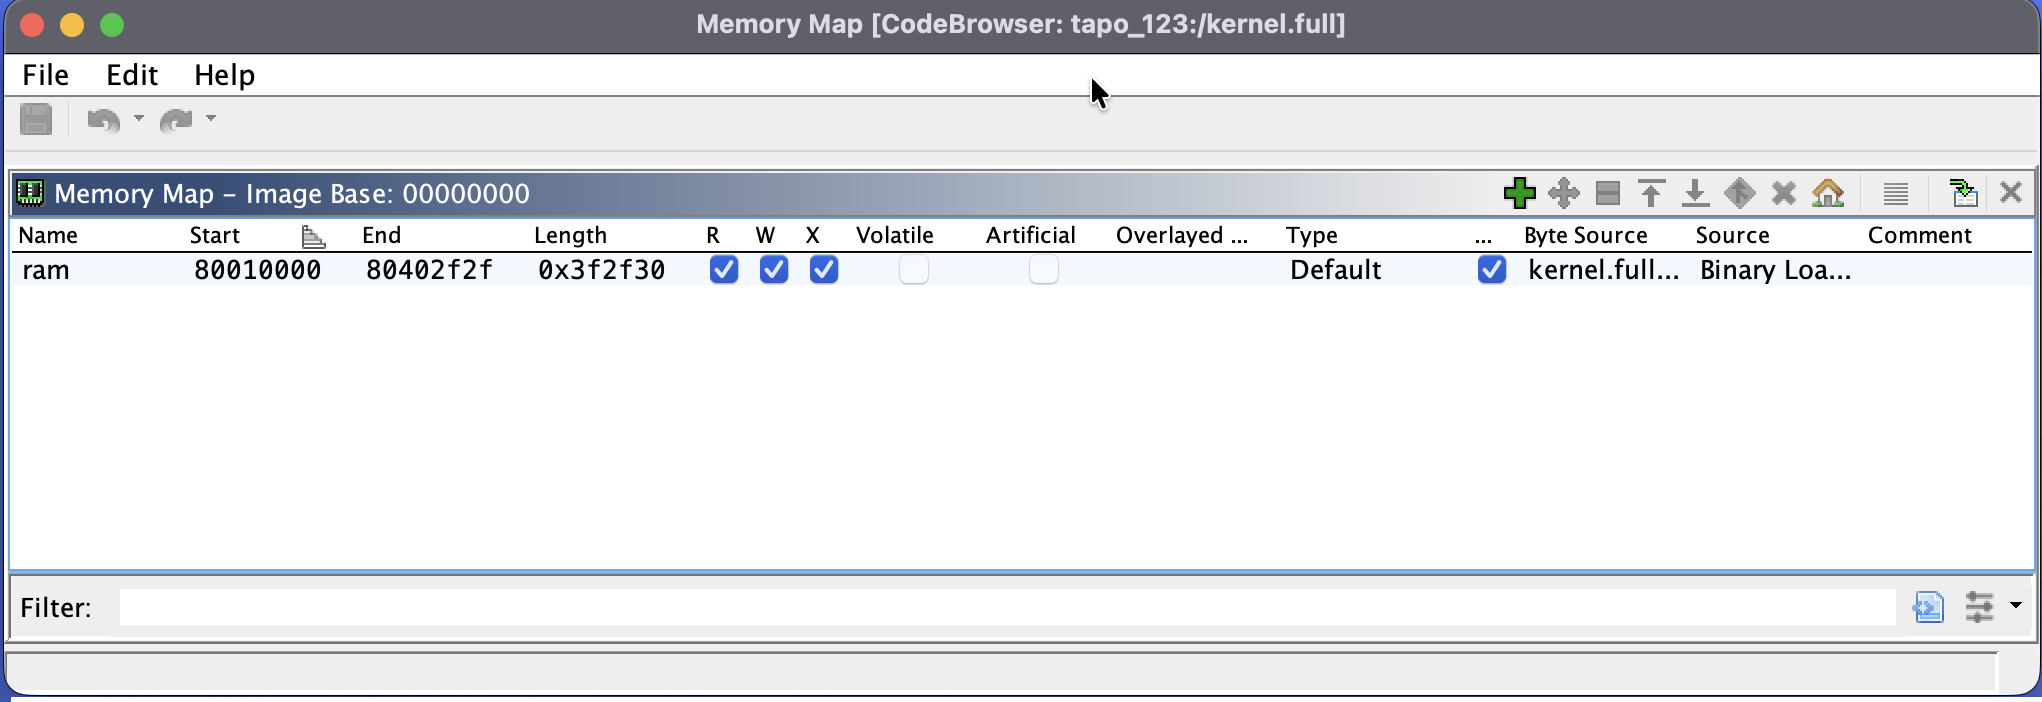 Memory Map → Set Image Base = 0x80010000. Get this wrong and nothing resolves.
Now the decrypt_rootfs_header … log strings have XREFs — but here’s the catch: they land you in one big function that is not the cipher. It’s the routine that parses the RedBoot partition table and kmallocs + reads the encrypted 512-byte header — the thing that actually prints decrypt_rootfs_header done at boot. Ghidra makes a mess of it (note the “Removing unreachable block” warnings up top), so the decrypt call is buried in mangled control flow.
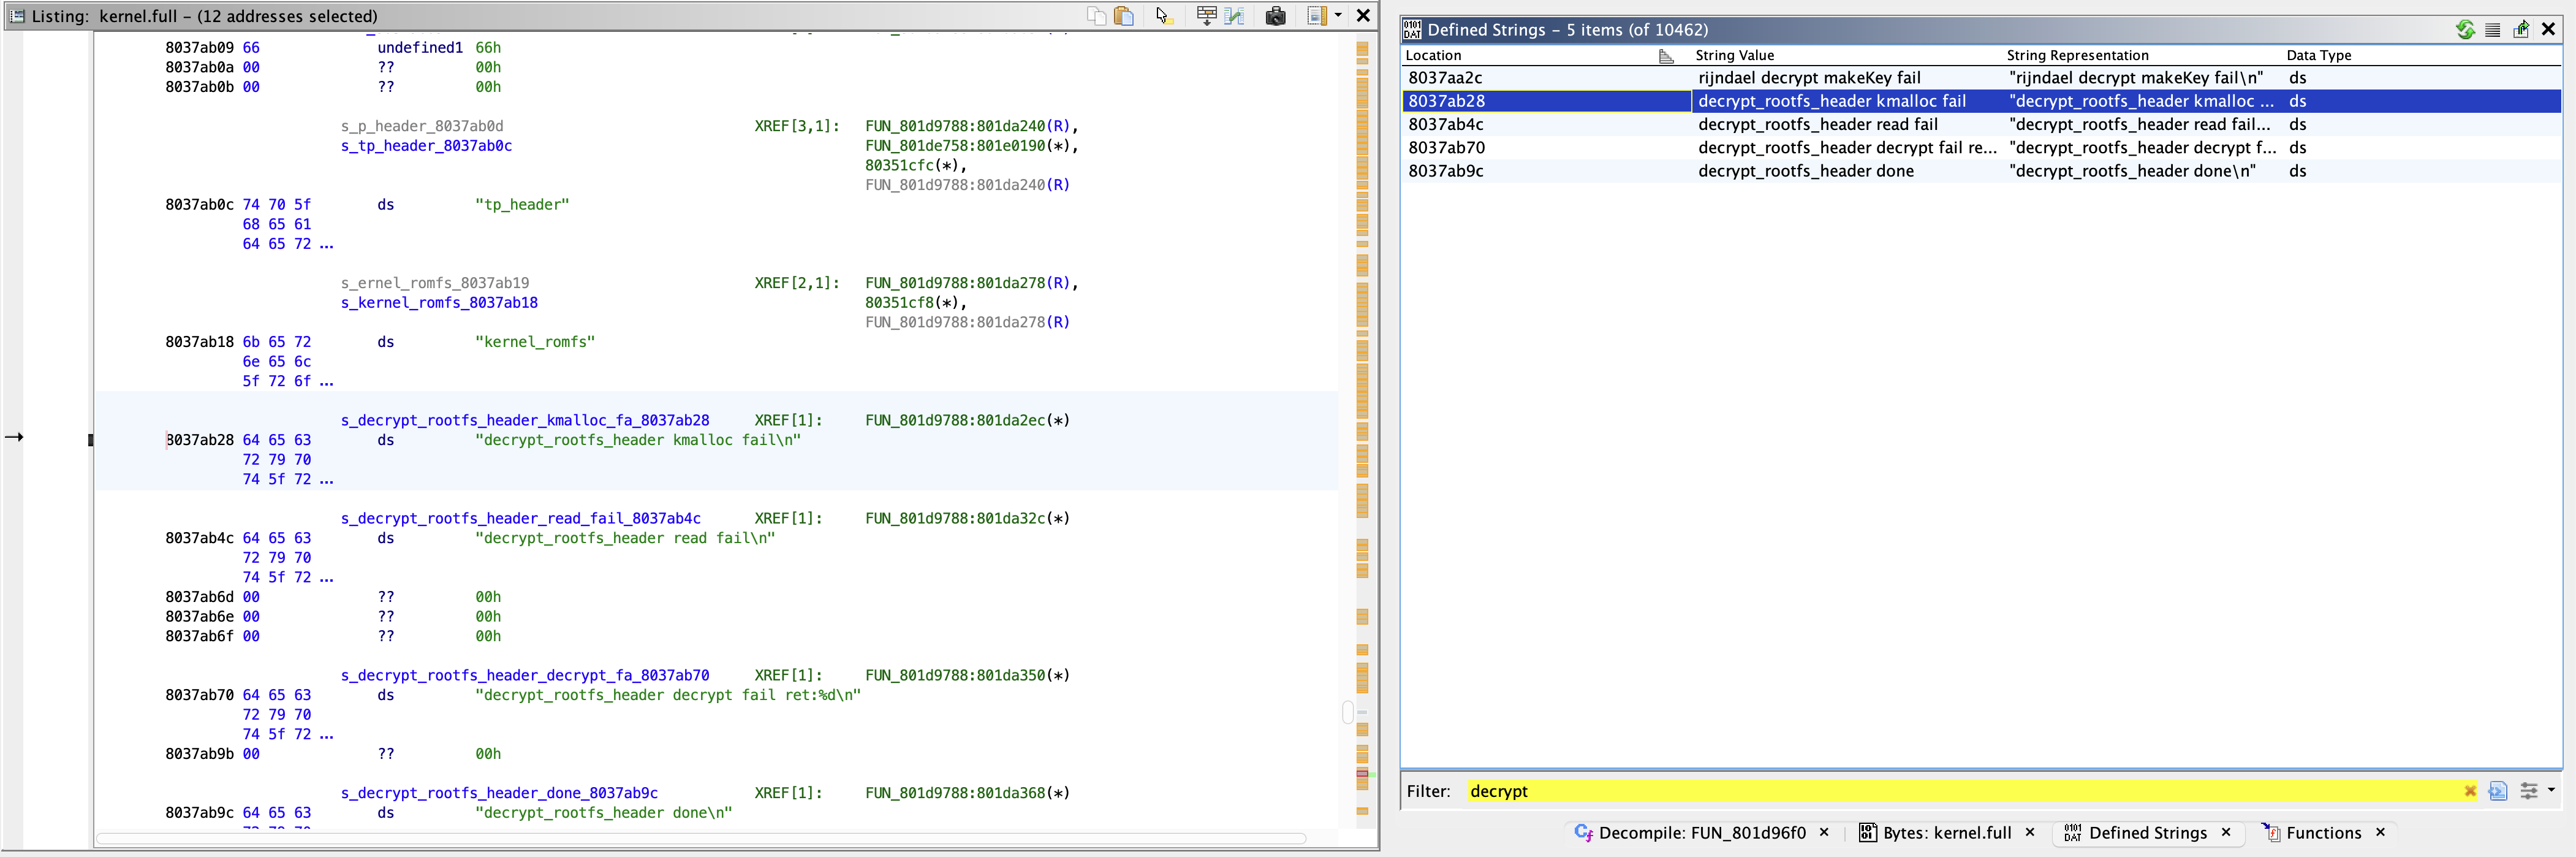 Where the strings point: partition-table parsing + the 512-byte header read. The crypto is one call deeper.
That function hands the header off to a small helper to do the actual work. Since the decompiler mangled the big one, the reliable way down is the call graph — right-click it → References → Show Call Trees → Outgoing Calls — and the helper (the one that calls three subs and references a 16-char string) is right there. Click in, and it’s short and clean:
int rootfs_aes_decrypt(int *buf /* 512-byte header */)
{
    byte keyInstance[560];    // expanded AES key schedule
    byte cipherInstance[24];  // mode + IV + running state

    if (rijndael_makeKey(keyInstance, DECRYPT, 0x80, "TP_LINK88i667gnt") < 0)   // 0x80 = 128-bit key
        return -1;
    if (rijndael_cipherInit(cipherInstance, MODE_CFB1, AES_CFB1_iv) < 0)        // mode 3 = CFB1
        return -1;
    return rijndael_blockDecrypt(cipherInstance, keyInstance, buf, 0x1000, out); // 0x1000 bits = 512 bytes
}
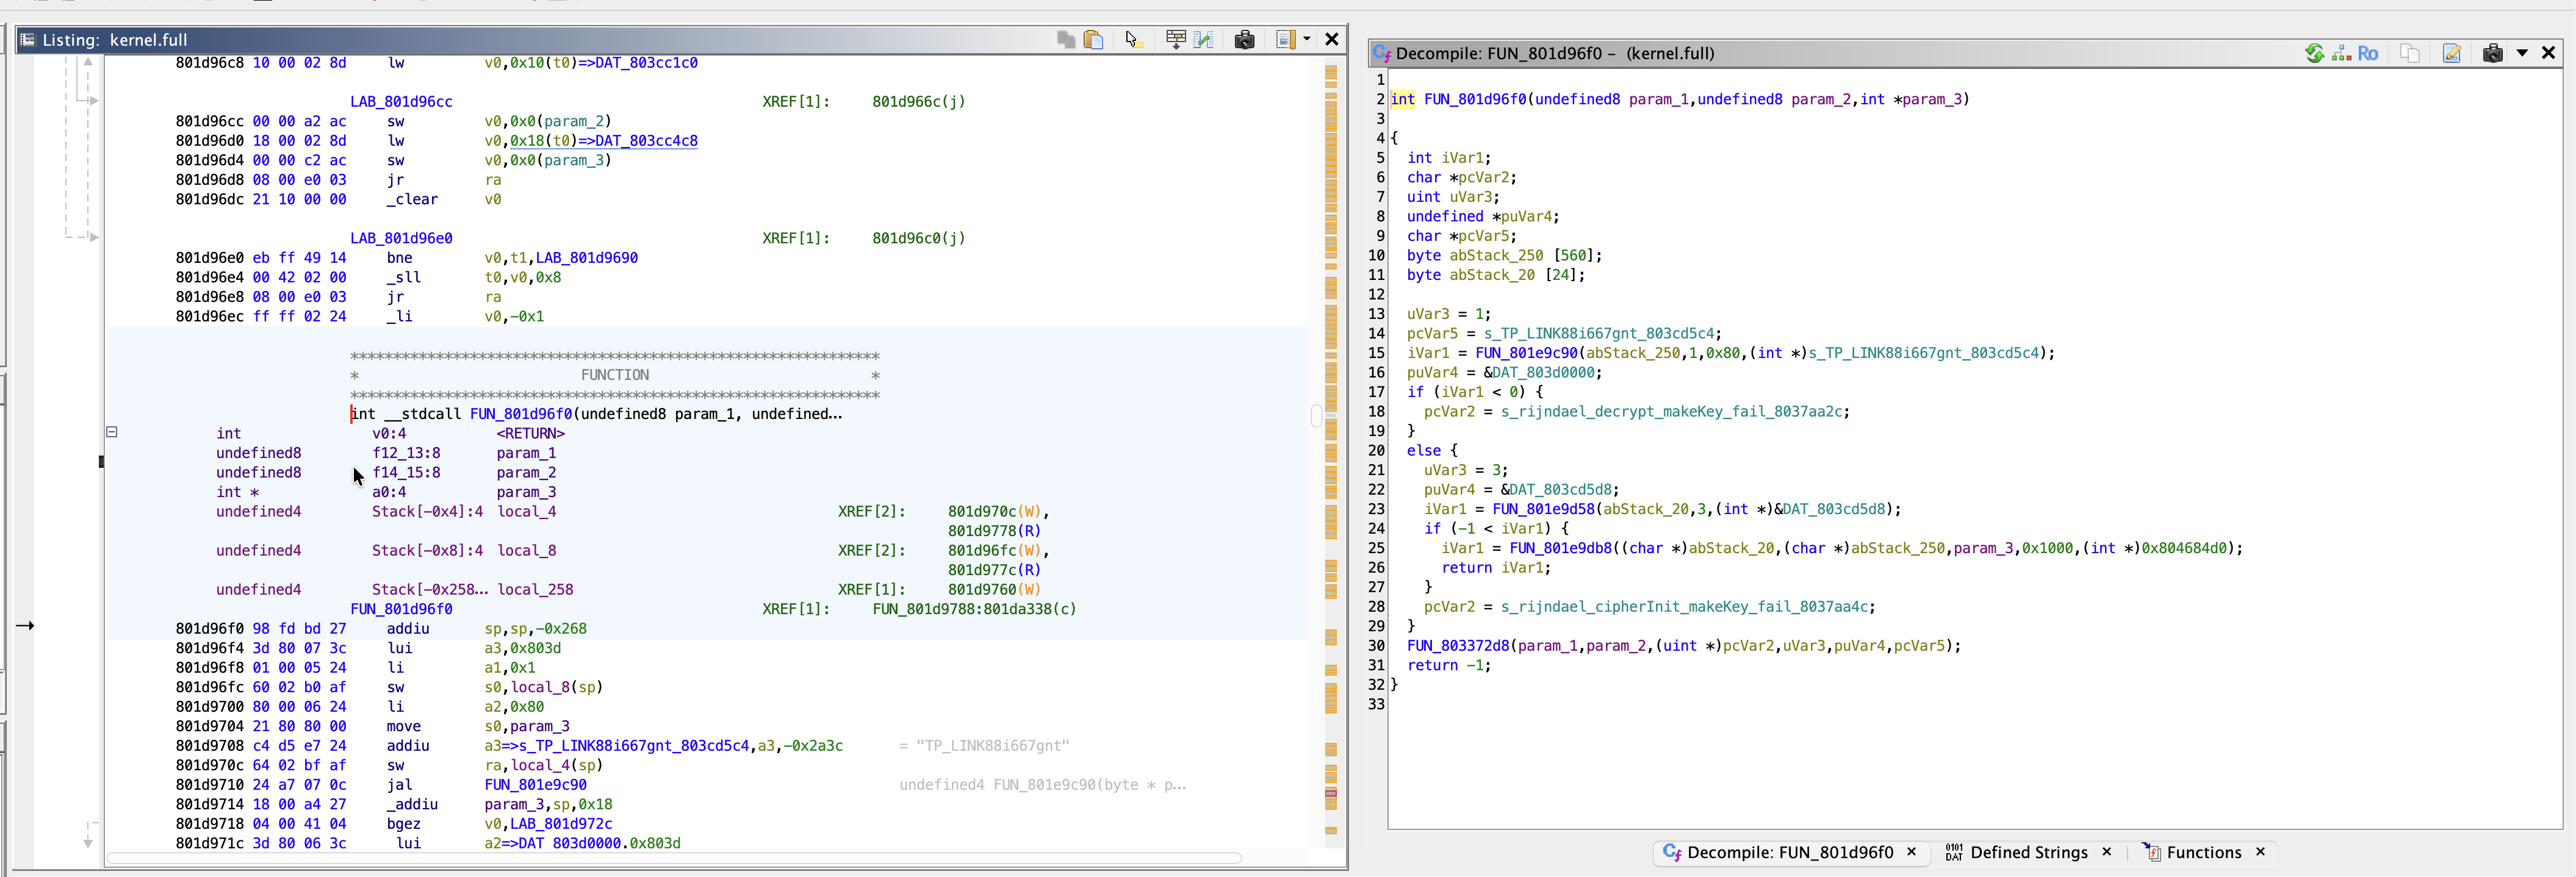 The helper itself — makeKey / cipherInit / blockDecrypt. There’s the key, the mode, and the IV.
That decompile answers everything:
makeKey(..., 0x80, ...)→0x80is 128 bits → AES-128, key =TP_LINK88i667gnt.cipherInit(..., mode 3, ...)→ mode 3 is CFB1 → openssl’s-aes-128-cfb1.blockDecrypt(..., 0x1000, ...)→ the size is in bits:0x1000= 4096 bits = 512 bytes, i.e. exactly the header.
It’s the rijndael-api-ref implementation, not the kernel crypto framework — which is why it reads so cleanly. (Cross-checking the GPL source drop, drivers/mtd/redboot.c has the same makeKey/cipherInit/blockDecrypt shape and the same constant arrays, with CONFIG_ENCRYPT_ROOTFS_KEY becoming the key. The GPL key is for a different model. For the C500 v2 I confirmed TP_LINK88i667gnt empirically — below.)
And the IV — the cipher-setup argument, a fixed constant referenced by exactly that one helper (Search → Memory for 55 aa de ad c0 de lands straight on it):
55 aa de ad c0 de 4c 49 4e 55 58 45 78 54 aa 55
      "d  e  a  d  c  0  d  e   L  I  N  U  X  E  x  T"
deadc0de. In the firmware. Of all the blogs. I did not plan this domain around a TP-Link IV, but I’ll absolutely take it.
 55aa deadc0de 4c49… — single XREF, straight into the cipher setup. Hi.
CFB is symmetric, so decrypting is just running the same key and IV. One openssl one-liner tests the whole theory — if it spits out hsqs (the squashfs magic), the key’s right:
dd if=rootfs.bin bs=512 count=1 | \
  openssl enc -aes-128-cfb1 -d -nosalt -nopad \
  -K 54505f4c494e4b383869363637676e74 \
  -iv 55aadeadc0de4c494e5558457854aa55 | xxd | head -1
# 0000000: 6873 7173 ...  hsqs   <-- squashfs. got it.
scripting the extraction
Once it worked by hand, I wrapped the whole thing in a script — tapoExtract — that slices every partition out of the dump, decrypts the rootfs header, splices it back, and runs unsquashfs:
#!/usr/bin/env bash
# tapoExtract <dump.bin> [KEY_ASCII] [OUTDIR]
set -euo pipefail
DUMP="${1:?}"; KEY_ASCII="${2:-TP_LINK88i667gnt}"; OUT="${3:-out_$(basename "${DUMP%.*}")}"
IV="55aadeadc0de4c494e5558457854aa55"
KEY_HEX="$(printf '%s' "$KEY_ASCII" | xxd -p | tr -d '\n')"
mkdir -p "$OUT/parts"

PARTS=(
  "factory_boot:0x000000:0x02d800"  "factory_info:0x02d800:0x030000"
  "art:0x030000:0x040000"           "config:0x040000:0x050000"
  "normal_boot:0x050000:0x070000"   "kernel:0x070200:0x1c0000"
  "rootfs:0x1c0000:0x3d0000"        "rootfs_data:0x3d0000:0x770000"
  "user_record:0x770000:0x7f0000"   "verify:0x7f0000:0x800000"
)
for p in "${PARTS[@]}"; do
  IFS=":" read -r name start end <<< "$p"
  dd if="$DUMP" of="$OUT/parts/$name.bin" bs=1 skip=$((start)) count=$((end-start)) status=none
done

# decrypt the first 512B of rootfs, sanity-check for the squashfs magic, splice it back
dd if="$OUT/parts/rootfs.bin" bs=512 count=1 status=none \
  | openssl enc -aes-128-cfb1 -d -nosalt -nopad -K "$KEY_HEX" -iv "$IV" > "$OUT/rootfs.head"
xxd "$OUT/rootfs.head" | head -1 | grep -qi 'hsqs' || { echo "wrong key"; exit 1; }
cp "$OUT/parts/rootfs.bin" "$OUT/rootfs.dec.bin"
dd if="$OUT/rootfs.head" of="$OUT/rootfs.dec.bin" bs=512 count=1 conv=notrunc status=none

unsquashfs -d "$OUT/squashfs-root" "$OUT/rootfs.dec.bin"
./tapoExtract dump.bin TP_LINK88i667gnt
And there it all is: etc/passwd, sbin/console.sh, the init scripts, the lot.
the console gate
Naively you’d think: just make the serial console turn on. But the camera only opens UART at boot if one of three things is true — a factory-mode flag, some field in its config blob, or… the existence of a single file: /tmp/usr_def_audio/cnsl_dbg, which lives on that writable jffs2 partition. In normal mode none of those are set, so the console code never even runs.
That third condition is the gift. The kernel runs /etc/preinit before any overlay, and preinit lives on the (overlay-proof) rootfs. So I added two lines — recreate the magic file on every boot, and nudge the UART pins on directly as insurance:
mount_root
mount_jffs2
touch /tmp/usr_def_audio/cnsl_dbg 2>/dev/null
[ -e /dev/mem ] && devmem 0x10011048 w 0x01800000 2>/dev/null
run_init
(The devmem write just clears the right GPIO bits to mux the pins to UART — exactly what the stock console.sh does.)
While I was in there I set a root password too. Funny detail: the hash lives in /etc/passwd, not /etc/shadow (BusyBox login takes the real hash from passwd here). And after all that effort, the password I shipped is… password. Don’t worry — SSH ended up key-only anyway.
the dropbear saga
A console is great, but I wanted SSH that doesn’t need a cable. The camera’s BusyBox has no telnetd, no dropbear, no ssh — nothing. So, build one.
This is where I lost an evening. First attempt, with the TP-Link GPL glibc toolchain: it compiles, it runs, and then every login fails with:
Login attempt for nonexistent user
Root very much exists. The problem is that static glibc won’t do getpwnam without NSS modules, so it can’t find any user, ever. No nsswitch.conf incantation fixes it.

The fix is musl, whose getpwnam reads /etc/passwd directly, no NSS. I grabbed a Bootlin musl MIPS toolchain (inside a linux/amd64 Docker container, because the toolchain is x86 and I’m on Apple Silicon) and built dropbear static:
git clone https://github.com/mkj/dropbear && cd dropbear && git checkout DROPBEAR_2022.83
CC=mipsel-buildroot-linux-musl-gcc ./configure --host=mipsel-buildroot-linux-musl \
  --disable-zlib --disable-lastlog --disable-utmp --disable-wtmp \
  CFLAGS="-Os -ffunction-sections -fdata-sections" LDFLAGS="-static -Wl,--gc-sections"
make PROGRAMS="dropbear dropbearkey scp" MULTI=1 STATIC=1 -j"$(nproc)"
A ~464 KB static MIPS binary. One last gotcha: the kernel has no IPv6, so dropbear tries an IPv6 bind and dies — pin it to IPv4 with -p 0.0.0.0:22.
where everything lives — the two-rootfs puzzle
Now, where do you actually put all this so it survives a reboot? The filesystem is an overlay stack, and the priority is: tmpfs (top, writable but volatile) > sp_rom (mtd7) > rootfs (mtd6). The live / is writable, but anything you change there evaporates on reboot. Persistence means baking changes into the squashfs images and reflashing.
So it became a packing problem:
- The small text edits —
preinit,passwd,/root/.ssh/authorized_keys— go into mtd6 (rootfs). It’s the layer that wins for those files, and they fit in the tight free space. - The 464 KB dropbear binary does not fit in mtd6. It goes into sp_rom (mtd7), which has 3.6 MB free, alongside an init script
S100dropbear(the overlay merges it into/etc/rc.d, so it just runs). - The SSH host key goes on the jffs2 partition, generated once on first boot.
Tiny detail that cost me a rebuild: the sp_rom squashfs with gzip came out to 4091 KB — just over the partition. Switched to xz: 3289 KB, fits.
The init script is small:
#!/bin/sh
KEY=/tmp/usr_def_audio/dk_key_rsa
[ -f "$KEY" ] || /usr/sbin/dropbear dropbearkey -t rsa -f "$KEY" >/dev/null 2>&1
/usr/sbin/dropbear -r "$KEY" -p 0.0.0.0:22 -s &
(-s disables password login over SSH — key only. The UART password stays as a fallback.)
flashing it back by hand
Repacking mtd6 means rebuilding the squashfs and re-encrypting the first 512 bytes — same key, same IV (CFB is symmetric, remember): decrypt the original header, confirm it’s hsqs, build the new squashfs with the same compressor/block size, then re-encrypt the new header and splice it on. I did this and the padding by hand rather than scripting it, partly because of the next two landmines.
Padding. Each image has to be padded to its exact partition size. I padded with >> once and watched the padding get added twice (some shell helpfully ran the redirect twice). Use dd with a fixed size instead — idempotent, no surprises:
# mtd6 -> 0x210000 = 33 x 64k    |    mtd7 -> 0x3a0000 = 58 x 64k
dd if=/dev/zero of=rootfs.flash.padded.bin bs=64k count=33
dd if=rootfs.flash.bin of=rootfs.flash.padded.bin bs=64k conv=notrunc
wc -c < rootfs.flash.padded.bin     # must be 2162688
Hex counts, again. Same SD route back — write both images to the card at two offsets (seek=0 for mtd6, seek=16 for mtd7 in MB) — then flash from U-Boot, where every count is hex. Erase, write, read back, and cmp.b to verify each partition:
# mtd6 (rootfs) at flash 0x1c0000
mmc read 0x80600000 0 0x1080
sf erase 0x1c0000 0x210000
sf write 0x80600000 0x1c0000 0x210000
sf read  0x81000000 0x1c0000 0x210000
cmp.b 0x80600000 0x81000000 0x210000     # -> "same"

# mtd7 (rootfs_data) at flash 0x3d0000 — same dance with 0x3a0000
The thing I’m most happy about: I never touched U-Boot, the kernel, or the wifi-calibration partition. The boot chain stays stock, so the slp prompt is always there — worst case I reflash the originals and it’s like nothing happened. Hard to brick when you keep the escape hatch intact.
the payoff
Reboot. The console comes up on its own, login works, and from the couch:
ssh -i ~/.ssh/id_rsa root@<camera-ip>
Pubkey auth succeeded for 'root' with ssh-rsa key
A 40€ camera, now a tiny Linux box I actually own.

loose ends
One thing I haven’t closed: the camera still phones home to TP-Link’s cloud, and it has auto-upgrade switched on. An OTA would happily overwrite both of my modified partitions and undo all of this. So the real “done” here is network-side — sinkhole the cloud and upgrade domains at the router, or stick the camera on a VLAN with no way out. That’s the next post.
Big thanks to Quentin Kaiser (QKaiser), whose work on the encrypted-rootfs scheme in related TP-Link cameras saved me a lot of guessing. The key changes per model, but the shape of the thing is the same — and now you know how to go find it.